To create a new document, use the following steps.
NOTE: All dialog box items are described in detail in this topic after the procedure.
+ = [ ] : ; \ " | \\ < > , . ? / * &
In addition, valid DOS device names such as the following should NOT be used:
aux, com1, com2, com3 com4, con, lpt1, lpt2, lpt3
When the sample document has completed scanning, information about the timing marks and form ID marks of each sheet appears in the lower left of the dialog box.
If you now want to change the document title in the Title field, you must click in the field and type the new title (overwriting the old title); you cannot delete or edit the title.
If you add or delete documents from an application, you need to check the document sequence definition to make sure it references the remaining documents correctly. See Document Sequence.
The title of the document. There is a maximum of 40 characters. See additional information above about special characters and devices names in the document title.
The number of the document. This is assigned by ScanTools software in the order in which documents are created within an application. You cannot change it.
This shows the current total number of sheets in the document. Use this to change the number of sheets in the document. You can type in a new number or use the arrows. Changes are made to the end of the document, after the last currently defined sheet. You do not need to be on the last sheet to add more sheets to the end. The number entered here also appears as reference in the Sheet <number> of <number> area in the Individual Sheet Information section of the dialog.
These check boxes broadly define the locations where a mark is considered to be a form ID mark, when you are scanning to define form ID marks and timing marks, or when you are using a background form image to define form ID marks and timing marks. When a box is checked, marks ONLY in that area are interpreted as form ID marks. The Top Side and Timing Mark 1 check boxes can be used together. Example: If both are checked, then all marks on timing mark one of the top side are considered to be form ID marks. If both are not checked, then all marks on all timing marks on both sides of a sheet are considered to be form ID marks.
These check boxes broadly define the locations where a mark is considered to be a form ID mark, when you are scanning to define form ID marks and timing marks or using a background form image to define form ID marks and timing marks.
For Image Scanners Only: If the application has form ID marks defined on the bottom side of a sheet and OMR From Image is selected in the Application Settings dialog, you must enable the image for the bottom side by setting Enable Image to Top and Bottom in the Application Settings dialog.
For booklets only, this section enables you to determine how strictly ScanTools software checks for missing sheets in booklet documents.
If you do not have a background form image TIFF file, load a sample document in your scanner and click this button to start scanning all sheets, as currently defined in the Number of Sheets area above. Information about all marks on all sheets, including form ID marks, timing marks, and any response marks filled in are transferred to the dialog. If you use an image scanner, grayscale images of the of the non-dropout elements on the sheets are also displayed and saved.
TIP: The grids on your form are typically not visible on the scanned background form image because the ink is not visible to the scanner. You can easily overcome this disadvantage by pencil marking grid outlines on your form before scanning, as shown in Application Design Window Settings. This mark up will enable you to easily draw your grid definition.
The images are saved in the Applications directory, as defined in the Paths dialog. A specific file naming convention is used for these images. The images are also loaded as the background images for the document, replacing any existing background images that were loaded.
If you do not have a background form image, this is the recommended button to use, unless you need to scan a booklet one sheet at a time.
NOTE: If ScanTools Plus is unable to acquire the form ID or timing marks (e.g. because of a skew problem), then the image will not be loaded as your background form image. A synthesized image is used instead.
If you have a background form image TIFF file, use this to add or replace the top and bottom background form image files for one or all sheets of the document. The Add/Replace Background Form Images for Sheet # of # dialog appears. A background form image provides an accurate visual representation of the printed form, making it easier to define grids for the application. Form ID marks and the number of timing marks are automatically detected from the background form image.
When this checkbox is checked, the data for the document will not be written to the data file during scanning. This feature is typically used in conjunction with sticky fields to propagate data to forms following a "header" form without writing the "header" data to the output record. For details see: Output Field Entry dialog StickyField.
Use this control to move to a specific sheet within the document, so you can define timing mark, sheet thickness, and form ID information. You can type in a new number or use the arrows.
The second number is for reference only, and tells you the total number of sheets currently defined, from the Number of Sheets area in the Document Information section of this dialog.
If you do not have a background form image TIFF file, use this button to scan a single sheet. Information about all marks on the sheet, including form ID marks, timing marks, and any response marks filled in are transferred to the dialog. If you use an image scanner, a grayscale image of the of the non-dropout elements on the sheet is also displayed and saved.
TIP: The grids on your form are typically not visible on the scanned background form image because the ink is not visible to the scanner. You can easily overcome this disadvantage by pencil marking grid outlines on your form before scanning, as shown in Application Design Window Settings. This mark up will enable you to easily draw your grid definition.
The image is saved in the Applications directory, as defined in the Paths dialog. A specific file naming convention is used for these images. The image is also loaded as the background image for the document, replacing any existing background image that was loaded.
NOTE: If ScanTools Plus is unable to acquire the form ID or timing marks (e.g. because of a skew problem), then the image will not be loaded as your background form image. A synthesized image is used instead.
Adds a new sheet before the current sheet.
Removes the current sheet from the document.
If you have a background form image TIFF file, use this to add or replace the top or bottom background form image files for this specific sheet. The Add/Replace Background Form Images for Sheet # dialog appears. A background form image provides an accurate visual representation of the printed form, making it easier to define grids for the application. Form ID marks and the number of timing marks are automatically detected from the background form image.
Changes the order of the sheet in the document. Move Up moves it one sheet closer to the beginning of the document, giving it a lower sheet number. The sheet that was in front of it moves down one sheet. Example: Current sheet is sheet 3, Move Up makes sheet 3 become sheet 2, and what was sheet 2 becomes sheet 3.
Changes the order of the sheet in the document. Move Down moves it one sheet closer to the end of the document, giving it a higher sheet number. The sheet that was after it moves up one sheet. Example: Current sheet is sheet 3, Move Down makes sheet 3 become sheet 4, and what was sheet 4 becomes sheet 3.
The number of timing marks on the top side of the sheet. The range of valid numbers is 0 - 125.
The number of timing marks on the bottom side of the sheet. Range of valid numbers is 0 - 125.
NOTE: You can define a single sheet that does not contain timing marks or form ID marks. See Forms Without Timing Marks, Archiving Single Sheets without Form ID Marks or Timing Marks, Graybox Tool, and Grid Measurement for additional information.
The thickness of the sheet displayed is used as a value for thickness checking. The range of valid values is 0 - 13 mils (1 mil = .001 inch). The default value is zero. NOTE: Some scanners do not use this information. For details on thickness checking by scanners, see Sheet thickness checking.
For iNSIGHT 20 and iNSIGHT 30 Scanners: iNSIGHT 20 and iNSIGHT 30 scanners do NOT support sheet thickness checking; any values defined in the application are ignored when scanning with an iNSIGHT 20 or iNSIGHT 30 scanner.
For EZData Scanners: The EZData scanner does NOT support sheet thickness checking; any values defined in the application are ignored when scanning with an EZData scanner.
This area shows the position of each form ID mark currently defined on the form. It gives the position according to Cell number, Timing Mark number, and Side of sheet. Form ID marks defined using this control appear as red rectangles in the application definition design window.
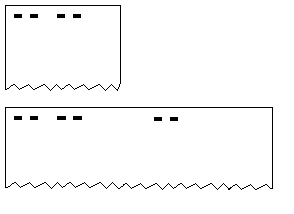
This is useful in handling cases in which the black form ID marks of two (or more) different sheets in the same application are interpreted as being the same because they are a superset or subset of each other. For example, in the following diagram, one of the forms is narrower than the other, at least one black ID mark on the larger sheet is outside the width of the narrower sheet,and the first four ID marks of both forms are the same. ScanTools is unable to distinguish between them with Normal Form ID Matching and black ID marks only.
ScanToolscan distinguish between the forms however by either
See the Form ID Matching dialog for additional information.
NOTE: When form ID marks are determined automatically by scanning a document, only black marks are picked up. White marks must be defined manually, using the Add Form ID dialog.
To change an existing form ID mark, select it from the list so it is highlighted and double click on it. You receive the Add Form ID dialog where you can change the information for an existing mark.
TIP: If a form ID mark is used in conjunction with the horizontal adjustment feature, be sure to enable the appropriate OMR/Merge Horizontal Adjustment check box on the Applications Settings dialog.
Use this button to add a new form ID mark. The Add Form ID dialog appears where you can define information for a new ID mark.
Use this button to delete an existing form ID mark from the document. First select (by highlighting) the form ID mark definition in the Form ID Mark Locations window and then click the Delete button. You receive a delete confirmation message only if Confirmations are set to include Minor deletes.
Bias Bar Location on Top Side: The EZData scanner requires a bias bar be defined for every sheet of every document. A bias bar is a row of 12 black cells and is used at scanning time to make sure the scanner read head is functioning properly. The bias bar is on all printed forms used by the EZData scanner. EZData scanners are single-side read scanners so the bias bar is always on the top side of the document.
Enter the number that corresponds to the location of the timing mark on which the bias bar is printed. If you use the Scan button to define the EZData document, the timing mark number is automatically inserted. Valid values are 1 through the highest timing mark number on the document. Zero (0) is an invalid number for the EZData scanner.
If skew marks are printed on the document, they must be defined manually. Skew marks are not automatically defined by scanning a sheet and/or adding a background image .tif file. This area shows the position of each skew mark currently defined on the form. It gives the position according to Cell number, Timing Mark number, and Side of sheet. Skew marks defined using this control appear as green squares in the application definition design window.
Use this button to add a new skew mark. The Add Skew Mark dialog appears where you can define information for a new skew mark.
Use this button to delete an existing skew mark from the document. First select (by highlighting) the skew mark definition in the Skew Mark Locations window and then click the Delete button. You receive a delete confirmation message only if Confirmations are set to include Minor deletes.
To edit a currently defined skew mark, select (highlight) the entry in the Skew Mark Locations list, and double click on it. The Add Skew Mark dialog appears with the currently defined values. You can change the values, use the OK button to exit, and the new values will appear in the list.
Note: (For iNSIGHT 20 and iNSIGHT 30 scanners only.) When using .200 line read spacing, using skew marks within the form design is recommended for optimum accuracy.
Top Side Dynamic Threshold Type sets the Dynamic Threshold Type - Document/Sheet Level used on the image for the top of the sheet and Bottom Side Dynamic Threshold Type sets the Dynamic Threshold Type - Document/Sheet Level used on the image for the bottom of the sheet.
Setting Dynamic Threshold Type selects the method of processing the grayscale data in an image to try to choose the best grayscale level to set as the largest grayscale value which is left unchanged in a grayscale clip or full page image on the image for the top or bottom of the sheet. These values are known as the Top and Bottom Upper Grayscale Filters. All pixels with values greater than this Upper Grayscale Filter are set to the same value to clean up the background and increase compressibility. The Upper Grayscale Filter is chosen such that the maximum undesirable background is removed while preserving all the good image data. This Dynamic Threshold type method also governs the way the bitone level is chosen, since the bitone level is referenced from the grayscale level. The method by which the bitone point is referenced is also determined by the Dynamic Threshold type. There are four different possible methods of accomplishing these two things. These four are Normal, Light/Little Data, Paper Eliminating, and Manual Grayscale Threshold.
If the user wishes to select a Manual Bitone point, this is done through the Dynamic Threshold Data Type for Bitone Clips in the Image Clips dialog or the Clip Attributes dialog.
Paper Eliminating Dynamic Threshold Standard Deviation allows setting of the value used by the Paper Eliminating Dynamic Threshold Type - Document/Sheet Level to determine how much of the grayscale range representing paper (in 0.1 standard deviation units) to eliminate when setting the Top and/or Bottom Upper Grayscale Filters on the image for the top and/or bottom of the sheet. This control is enabled only when either the top or bottom Dynamic Threshold Type is set to Paper Eliminating. The value set by this control applies to both the top and bottom images.
TIP: Making this value larger will clean up more of the background and achieve better compression but might remove valuable image data. Making this value smaller may help keep light image data but might produce an image with a dirtier background and cause a less compressible image.
|
See Help on Help for additional information on using this help file. See Scantron Technical Support for additional information on technical support and training options. See the ScanTools Suite System Requirements for further details on hardware and software requirements. ScanTools is a suite of products; the specific information you want may appear in the help for a different module. If you don't find what you're looking for here, try one of the following:
|
Scantron Corporation
Customer Service (forms, products, and services): 1-800-SCANTRON (722-6876) Technical Support: 1-800-445-3141 |
|
|
Copyright © 1998-2012 Scantron Corporation. All rights reserved. Use permitted only under license. www.scantron.com. No part of the Help or user guides may be reproduced in any form, or by any means, without express permission from Scantron Corporation. LINKS TO THIRD PARTY SITES This help system may contain links to third party websites ("Linked Sites"). The Linked Sites are not under the control of Scantron and Scantron is not responsible for the content of any Linked Site, including without limitation any link contained in a Linked Site or any changes or modifications to a Linked Site. Scantron is not responsible for web casting or any other form of transmission received from any Linked Site. Scantron provides Users with the ability to link the Assessment System to the Linked Sites as a convenience to you, and the inclusion of any link does not imply endorsement by Scantron of the Linked Site or any association with its operators. |
||
 Related topic