Modifying Text Boxes
Use this dialog to change settings for one or more text boxes on your document. Do one of the following to access this dialog:
- Double-click the shape.
- Right-click the shape, then select Modify.
- Select the shape, then select Shape Menu > Modify.
- Select the shape, then press Ctrl+E on your keyboard.
CAUTION: Changes made affect all text paragraphs in the text box.
CAUTION: Make sure the text box size is large enough to contain all of the text. If it is not, some of the text may be cut off when you print. This is particularly important when you are preparing Text for merge printing. Since the text box sizes are fixed in your design, you must make sure that the largest text entry from your database will fit in the text box.
There are two different text tools in Scantron DesignExpert software: Text and Caption Text. Both text tools create text fields but each has unique features that you can use for different purposes in your form design.
| Text |
Caption Text |
|---|---|
|
Text is used for long text passages such as instructions or survey questions. It has the following controls and features:
|
Caption text is used for short text passages such as form titles and the captions on hand print fill areas. Captions are always a single line of text with a maximum of 4,096 characters. All characters of a caption must be the same color and have the same font characteristics. Caption text has properties not available with paragraph text, they are:
|
Features common to both text types include:
- Font dialog
- Spell checking
- The Text Tool bar
- Document fonts dialog
- Missing fonts dialog
Default settings for text and caption text attributes such as font,
style, size, and line spacing are provided when Scantron DesignExpert
software is installed. You can change all of these attributes can be changed, as needed,
for individual text and caption text elements on your form. In addition, You can also change the defaults to suit your needs.
|
Text Attribute |
Text Type |
Default Setting at Installation |
Where to Modify the Default Setting |
|---|---|---|---|
|
Alignment |
Text |
Left |
Modify Paragraph dialog |
|
Baseline Shift |
Text |
None |
Modify Paragraph dialog |
|
Color |
Text, Caption Text |
Black |
Font dialog, Modify Text Box dialog |
|
Color |
Caption Text |
Black |
Modify Caption Text dialog |
|
Font |
Text, Caption Text |
Arial |
Font dialog |
|
Font style |
Text, Caption Text |
Regular |
Font dialog |
|
Horizontal Alignment |
Caption Text |
Center |
Modify Caption Text dialog |
|
Line Spacing - After Paragraphs |
Text |
Zero |
Modify Paragraph dialog |
|
Line Spacing - Between Lines |
Text |
Equals OMR response spacing: 5, 6, or 8 per inch |
Modify Paragraph dialog |
|
Margins
|
Text |
0.0 points |
Modify Text Box dialog |
|
Margins - Margins |
Caption Text |
0.0 points |
Modify Caption Text dialog |
|
Margins - Show margins |
Caption Text |
Unchecked |
Modify Caption Text dialog |
|
Overprint |
Caption Text |
Checked |
Modify Caption Text dialog |
|
Overprint |
Text |
Checked |
Modify Text Box dialog |
|
Paragraph Indentation
|
Text |
Zero |
Modify Paragraph dialog |
|
Rotation - Baseline |
Caption Text |
Zero Degrees |
Modify Caption Text dialog |
|
Rotation - Character |
Caption Text |
Zero Degrees |
Modify Caption Text dialog |
|
Screen |
Text, Caption Text |
100% |
Font dialog, Modify Text Box dialog |
|
Screen |
Caption Text |
100% |
Modify Caption Text dialog |
|
Show margins |
Text |
Unchecked |
Modify Text Box dialog |
|
Size |
Text, Caption Text |
10 pt. |
Font dialog |
|
Spacing - Inter -word |
Caption Text |
100% |
Modify Caption Text dialog |
|
Spacing - Inter-character |
Caption Text |
100% |
Modify Caption Text dialog |
|
Tabs - Alignment |
Text |
Left |
Modify Paragraph dialog |
|
Tabs - Tab Position |
Text |
None |
Modify Paragraph dialog |
|
Tabs - Units |
Text |
Equals OMR response spacing - 5, 6, or 8 per inch |
Modify Paragraph dialog |
|
Underline |
Text, Caption Text |
Unchecked |
Font dialog |
|
Vertical Alignment |
Caption Text |
Center |
Modify Caption Text dialog |
You can to merge information from a database file and print it on your cut sheet forms using your local laser printer. For OMR and OMR Laser Printer Only Documents, this includes print personalization of text, caption text, bar codes, and pre-slugged OMR response grids.
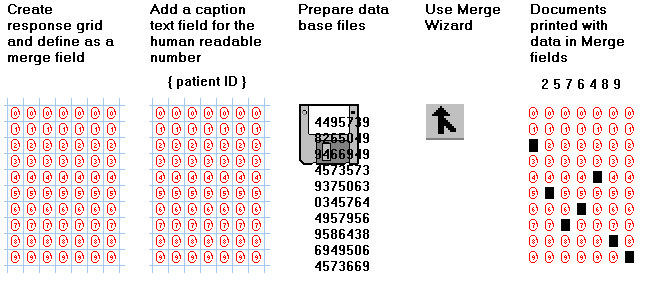
To use the print personalization feature, you first define text areas, caption text areas, and/or OMR response grids as variable data placeholders, and then use the Merge Wizard to link them to specific fields in your database file. You can then print your documents with your laser printer, using the Merge Wizard Printing function. The variable data from the database record is printed in the appropriate area; text characters are printed in the text or caption text areas, OMR response grids are pre-slugged with the appropriate data.
The overall process for implementing the print personalization feature is shown in the figure below. This example shows an OMR response grid with a caption above it; the response grid is available only in OMR documents. Click a step in the diagram below to learn more about it.
NOTE: Scantron DesignExpert software does not support print personalization (merge printing), including pre-printing, pre-slugging, and bar coding, for continuous forms, multi-parts, or finished booklets. Merge printing can, in some cases, be performed with booklet pages before the booklet is bound.
Database file types supported by Scantron DesignExpert software are:
- Comma Separated Text - Windows comma delimited file that contains ASCII text with each field separated by a comma. By convention, the extension .csv is used for this file type when you perform a Save As in a program such as a word processor, database, or spreadsheet. You may use a comma separated text file that is in the correct format, but has a different extension, or no extension. The first record MUST contain the database field names used by the Merge Wizard. The names can appear in any order.
- Tab Delimited Text - Windows tab delimited file that contains ASCII text with each field separated by a TAB character. By convention, the extension .txt is used for this file type when you perform a Save As in a program such as a word processor, database, or spreadsheet. You may use a tab delimited text file that is in the correct format, but has a different extension, or no extension. The first record MUST contain the database field names used by the Merge Wizard. The names can appear in any order.
- Microsoft Excel - This file type is from the Microsoft Excel program and has the extension .xls. Use of the "Text" data type is recommended.
- Microsoft Access - This file type is from the Microsoft Access program and has the extension .mdb.
TIP: See Merge Wizard Overview for additional information about Microsoft Excel database support, including our recommendation to convert Excel files to either comma separated or tab delimited text files.
Record numbering is supported via the Merge Wizard database interface for any database type. Specify it using the Merge Wizard Setup Record Numbers dialog. Apply record numbering as a number or as a bar code and as a pre-slugged OMR response grid. Use Caption text as a record number merge field for numbers and bar codes.
Serial numbering is supported via the Merge Wizard database interface, although a database file is not actually used during the operation. Serial numbers are generated according to values you specify on the Merge Wizard Setup Serial Numbers dialog. Apply serial numbering as a number or as a bar code and as a pre-slugged OMR response grid. Use caption text as a serial number merge field for numbers and bar codes.
Print personalization is supported for cut sheets in all Scantron DesignExpert software document types. Features vary somewhat between document types:
-
 For OMR documents printed at Scantron Print Services
Load your documents into your local laser printer and print the variable data in the appropriate text, caption text, and/or OMR response grid areas, using the Merge Wizard.
The printed document can be a stock form or a custom-designed one that was printed at Scantron.
As an alternative, you can send your database files to the printing facility, and Scantron Print Services will print the variable data onto the appropriate form. Files printed at Scantron Print Services also use additional file types, Scantron DesignExpert underlay (.deu) and Scantron DesignExpert overlay (.deo). These file types enable you to protect the design for the printed base form in an underlay, while using flexible overlays to control the print personalization.
-
For OMR documents printed
with the PrintFlex option
Load your plain paper into your local laser printer and print the entire document, including variable data, in the appropriate text, caption text, and/or OMR response grid areas, using the Merge Wizard.
-
For OMR Laser Printer
Only documents
Use Scantron DesignExpert stock form number 103188 or 265914 as your paper stock. Load it into your local laser printer and you can print both the fixed shapes of the Scantron DesignExpert document and the variable data from the database records in one pass.
-
For OMR Laser Printer
Only documents printed with the PrintFlex option
Use plain paper. Load it into your local laser printer and you can print both the fixed shapes of the Scantron DesignExpert document and the variable data from the database records in one pass.
Print personalization is supported in Text and Caption Text fields and in OMR response grids. Features vary somewhat between them.
-
Text
Variable text fields can be added to Text and linked to your database via the Merge Wizard.
The variable text placeholder is {VARIABLE_field}, where "field" is a name of your choosing. For example, {VARIABLE_student} or {VARIABLE_customer}.
One or more variable text placeholders can be embedded within a text block. For example, you can insert a name from your database into a paragraph.
A variable text placeholder can be the only text within a text block. For example, you can print an entire text block from your database.
Merge text style controls can be applied in your database to enable you to vary font, color, style, and so forth on a sheet by sheet basis. See Modifying Text Styles.
-
Caption Text
Caption Text can be defined as a variable text field and linked to your database via the Merge Wizard. For example, {Name}. Note that the field name is enclosed in braces.
Caption Text can be defined as a serial number field controlled via the Merge Wizard. For example, [Serial]. Note that the field name is enclosed in square brackets.
Caption Text can be defined as a record number field controlled via the Merge Wizard. For example, <Record>. Note that the field name is enclosed in angle brackets.
A Code 39 bar code font can be used for a variable text, serial number, or record number field if the information merged from your database must be interpreted by a bar code reader.
Merge text style controls can be applied in your database to enable you to vary font, color, style, and so forth on a sheet by sheet basis. See Modifying Text Styles.
-
OMR Response Grids
OMR response grids can be defined as pre-slug fields and linked to your database via the Merge Wizard so that response bubbles are automatically marked during printing.
Scantron DesignExpert supports the following Merge Data Types:
- Numeric (0-9)
- Alpha, no space (A-Z)
- Alphanumeric (Space, A-Z, Special Characters)
- Binary Coded Decimal (BCD) (1-2-4-8-P)
- Binary/Litho-code
- 1-Digit Response (1-9)
- 2-Digit Response (01-99)
There is no Merge Data Type for custom response designators and special character pre-slugging. However, standard Merge Data Types and your database can be adapted for this purpose. See Creating a Response Grid using the Grid Wizard or Modifying Response Grids for additional information.
Scantron DesignExpert can merge print variable data from a database to Text areas. This feature is in addition to and slightly different from merge printing of variable data in Caption Text areas.
When you specify delimited field names in a text area, the merge field is substituted for the delimited field. The delimiter is "{VARIABLE_field}", where field is the name of the merge print field. There can be one or more text fields per document. There can be one or more merge fields contained within a single text box. The same field name may occur multiple times in the single text box.
When you design your form, you must make the text box large enough to accommodate the largest expected block of merged text. The size of the text box does not change to accommodate the merge text at merge time.
Merging is controlled by and the when DesignExpert documents contain delimited text.
Scantron DesignExpert software has a Merge Text Style Control feature that enables you to control the style attributes of text printed from your merge database in addition to controlling it from the merge fields in your form. This feature can be used with merged text in both text and caption text fields.
Depending on the result you want, merge text style can be controlled by the placeholder on the form or by a tag in the database:
- To get the same text attributes for merged text on all forms, define text attributes in the placeholder on the form.
- To get different text attributes for merged text on each form, define text attributes in the database.
This feature is available with the MergePrint software utility in addition to the Scantron DesignExpert Merge Wizard.
When text style for a merge field is controlled by the merge field placeholder on your form, the appearance of text printed on every form is the same. For example, if a merge field on your form is defined as Times New Roman, 14 point, then text merge printed on every form for this field will be Times New Roman, 14 point:
| Text Attributes |
Merge Field Placeholder Examples |
Printed Text Examples |
|---|---|---|
|
Times New Roman, 14 point |
{Name} |
Allan Barnes |
|
Arial, 12 point, Bold |
{Name} |
Becky Colter |
|
Times New Roman, 16 point, Bold, Italic, Red, 50% |
{Name} |
Charles Davis |
See Modifying Text Boxes or Modifying Caption Text for details on setting text attributes on placeholders.
When text style for a merge field is controlled by a tag in the merge database, the appearance of text printed on each form can differ.
Text Style Control attributes include Bold, Italic, Underline, Font and Size, Color and Screen percentage:
|
Text Attributes |
Examples |
|---|---|
|
Bold |
Allan Barnes |
|
Italic |
Becky Colter |
|
Underline |
Charles Davis |
|
Font and Size |
Denise Edison |
|
Color and Screen Percentage |
Elizabeth Garman |
These controls can be applied singly or in any combination. For example,
|
Text Attributes |
Examples |
|---|---|
|
Bold, Italic |
Allan Barnes |
|
Italic, Underline |
Becky Colter |
|
Font and Size, Color and Screen Percentage |
Charles Davis |
|
Bold, Color and Screen Percentage |
Denise Edison |
NOTE: Merge field (placeholder) text attributes Bold, Italic, and Underline override text attribute tags in your database. For example, if your merge field is Bold, your printed text will be Bold even if the <Bold/> tag is not included in your database.
The following chart displays the available text attributes, the tag for each attribute, an example of how the tag is applied in the database for a merge field called "Name" and an example of what the printed results will be with the application of this tag. An explanation of tag formatting requirements follows.
|
Text Attribute |
Tag |
Database Example |
Printed Result |
|---|---|---|---|
|
None |
None |
Name |
Allan Barnes |
|
Bold |
<Bold/> |
<Bold/>Name |
Allan Barnes |
|
Italic |
<Italic/> |
<Italic/>Name |
Allan Barnes |
|
Underline |
<Underline/> |
<Underline/>Name |
Allan Barnes |
|
Font and Size |
<Font name: FontName1 size: FontSizeInPoints2/> |
<Font name: Times New Roman size: 16/>Name |
Allan Barnes |
|
Color and Screen percentage |
<Color index: ColorPaletteIndex3 screen: ScreenPercent4 /> |
<Color index: 2 screen: 100 />Name |
Allan Barnes |
|
Bold, Font and Size |
<Bold/><Font name: FontName size: FontSizeInPoints/> |
<Bold/><Font name: Times New Roman size: 16/>Name |
Allan Barnes |
|
Underline, Color and Screen percentage |
<Underline/><Color index: ColorPaletteIndex screen: ScreenPercent /> |
<Underline/><Color index: 2 screen: 100 />Name |
Allan Barnes |
|
|||
- Tags are case sensitive, as shown in the chart above.
- Tag syntax is as shown in the chart above.
If you need to print a tag that is included in your database, place the tag <Escape> before and after the tag to be printed. For example:
|
Database Example |
Printed Result |
|---|---|
|
<Bold/><Escape><Bold/><Escape> Name |
<Bold/> Allan Barnes |
- The Merge Wizard and the MergePrint Utility support Merge Text Style Control with all Scantron DesignExpert supported database types.
|
Database Type |
Merge Wizard |
MergePrint Utility |
|---|---|---|
|
Comma delimited (*.csv) text files |
Yes |
Yes |
|
Tab delimited (*.txt) text files |
Yes |
Yes |
|
Microsoft Access (*.mdb) files |
Yes |
Yes |
|
Microsoft Excel (*.xls) files |
Yes |
Yes |
TIP: See Merge Wizard Overview for additional information about Microsoft Excel database support, including our recommendation to convert Excel files to either comma separated or tab delimited text files.
Text and caption text box sizes are fixed in your design. If you are merge printing either type of text, make sure that the text box is large enough to fit the largest amount of text you expect to merge from your database. If the box is too small, the text that doesn’t fit will be truncated.
CAUTION: If you are merge printing caption text or paragraph text that will be read with the optional RealTime Character Recognition component of Scantron ScanTools Plus software, see ScanTools Help for font recommendations.
What's on the screen?
The Modify Text Box dialog includes the following tabs:
-
Position and Sizing
Change the position of the caption text box or lock its position. You can also drag the box to a new position, but this tab gives you a little more precision in placement.
NOTE: You cannot change the position or lock for multiple shapes. If you have more than one shape selected, these options are disabled.
Use this element… …to… Lock Lock and unlock the text box.
Use this option… …to… Lock Anchor the selected shape to the current location on the form, and prevent it from being cut, deleted, moved, or resized. If you want to change or delete the shape, you need to first unlock it.
Lock Vertical Anchor the selected shape vertically so you can only move or resize the shape horizontally.
Lock Horizontal Anchor the selected shape horizontally so you can only move or resize the shape vertically.
Unlock Unlock the selected shape so you can cut, delete, move, or resize it in any direction.
You can also lock or unlock the text box position by right-clicking. See Shape Pop-up Menu for details.
Position & Size Define the precise location and size of the shape. The alignment grid is based on 0 horizontal and 0 vertical as the upper left-hand corner of the document workspace.
- Select a unit of measurement. The unit of measurement can be set in points, millimeters, inches, or fractions of an inch (1/5, 1/6, 1/8, and 1/10).
- Enter Horz and Vert values to define the horizontal and vertical coordinates of the upper left corner of the shape relative to the background alignment grid.
- Enter Width and Height values to define the size of the shape.
You can also move and resize the shape by dragging it with the mouse.
-
Text Color
Define the color to be used for the caption text. All text for the caption will be set in this color.
Use this element… …to… Color
Set the color. The choices are selected from the list established when you created the document, including black and white.
Screen
Set the color screen. Screens are an economical way of adding color variety using a single-color process. They also enable you to add shading without using a different color. Select a value between 10% and 100%, in 10% increments (plus 15%). The lower the value, the lighter the color appears.
TIP: If you are using shading to create an underlay, use ‘none’ as the color. Any gradient of shade, or the color white, will be screened at 50%, and appear grayed out.
Overprint Indicate whether this text is overprint.
The default is for this box to be checked. This means that any graphic element you create will be printed on top of the element beneath it. The top element will not knock a hole in the bottom element.
CAUTION: Do Not Change this setting unless you are familiar with the complexities of color overprinting and color trapping. When you send your document to Scantron Print Services for printing, our graphic arts specialists will analyze your form and determine if the overprint setting for any element needs to be modified. If you are unfamiliar with this process, we will perform this function for you.
Make current settings the default
Save the current values to be in effect when you create new text other text boxes.
-
Margins
Define the distance from the edge of the text box to the text characters.
Use this element… …to… Margins Define the distance from each edge of the box to the text.
- Select a unit of measurement. The unit of measurement can be set in points, millimeters, inches, or fractions of an inch (1/5, 1/6, 1/8, and 1/10).
- Enter a value for each of the margins.
Show margins
Display a line that shows the margins within the text box.
Make current settings the default
Save the current values to be in effect when you create new text other text boxes.
How do I…
- Select Tools > Text or click
 .
. - Place the mouse pointer where you want the text box to begin, click and drag the mouse pointer to where you want the text box to end, then release. The text cursor appears immediately inside the text box, where you can enter the text characters you need, or import a text file using the Text Menu.
TIP: When you create a text box that will be placed to the left-hand side of an OMR response grid, do not locate it edge to edge with the OMR response grid. Instead, provide a space between the two shapes of at least half a response position. This design strategy will help make your form easier to use and avoid the possibility of text inadvertently overlapping OMR response bubbles.
- Select a text box.
- Select Text > Import Text.
- Select a text file.
In Scantron
DesignExpert you can import the following two formats.
- ASCII (.txt) – unformatted text
- RTF (.rtf) – formatted text
See Import Text for details.
Select text inside the text box and right-click. Use the Edit Text pop-up menu to edit and format the text.
- Select text within a text box.
- Select Text > Styles.
- Select a style from the list.
- Click Apply.
- Click Close.
See Text Styles dialog for details on creating, editing, and deleting text styles.
See Spell Check for details.
You may want to create the illusion that an element of your design, such as a box or response grid, is floating and casting a shadow. This effect is called a "drop shadow."
|
Without
|
With
|
Scantron DesignExpert does not have a drop shadow tool but it is relatively easy for you to create your own simple drop shadow if you need one.
- Create or select an element.
- Draw a box of the same size as the element.
- Use Modify Box to create your "shadow" by changing the box Stroke and Fill to a screen percentage such as 15%.
- Duplicate this box and use Modify Box to change the second box Stroke and Fill to Solid Style and White Color.
- Drag the "white" box on top of your element (an OMR response grid in this case) then move it to the graphic layer behind the element (right-click the box, then choose Move to Back).
- Drag the 15% screened box on top of your element and offset down and to the right by half a response grid space. Then, move it to the graphic layer behind the element.
- Select all of the elements in your finished grid and Group them so that they stay together when moved on the workspace.
Your element is complete with drop shadow. We suggest you experiment with other shapes, screen percentages, and colors. And, be sure to add it to your Shape Library if you will use it with other form designs.