The Scanning Options dialog allows you to set several parameters for an application to use during scanning, online scoring, online conversion, and online editing.
CAUTION: The settings in this dialog affect only the currently selected application. Each application has its own Scanning Options settings. You should view and check the Scanning Options settings each time you select a different application, or configure the scanner differently with the same application.
This dialog can be accessed from both the Application Module and the Main Window.
Scanning options are the only options used at scan time. The other ScanTools options are used only for post-scan actions:
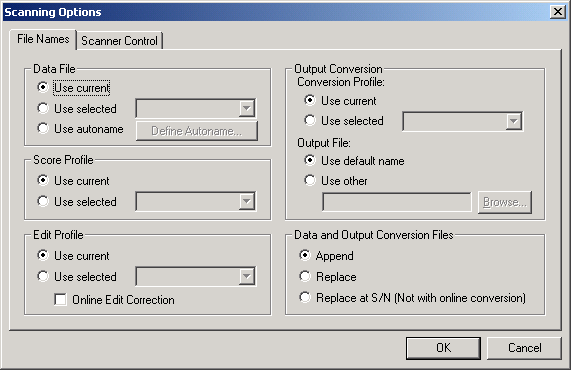
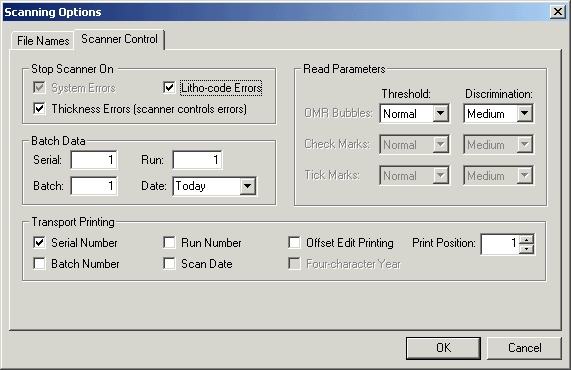
The Scanning Options dialog consists of two tabs - a File Names tab and a Scanner Control tab.
The following is an illustration of the File Names tab followed by the Scanner Control tab. Both illustrations contains "hot spots". Click in the area for more information and online help will jump to the appropriate supporting text.


The File Names tab provides settings for the Data file, Score profile, Edit profile, Conversion profile, and Conversion output file fields.
The Data File group box names the file to which scanned data is written.
Use current - automatically selects the file name currently appearing in the File Bar.
Use selected - shows the file name list. Make the appropriate selection. Whatever you select here overrides the file name currently in the File Bar.
Use autoname - allows you to create a file name that does not change from scan to scan; or you can define an automatic naming template that enables ScanTools software to create a different file for each scan.
To select an automatic naming template, use the following steps:
This group box names the score profile to be used for online scoring during scanning.
This group box names the edit profile to be used. If editing will be performed after scanning, an edit profile must be selected during scanning so that the document can be flagged if editing is needed.
For Image Scanner Implementation Only: The Image clips acquired at scan-time and displayed later during post-scan editing are based on the edit profile selected at scan-time.
This group box names the edit profile to be used for online editing during scanning and lets you select online edit correction.
The Online Edit Correction check box lets you correct failing document records while the scanner is scanning the forms. When this check box is checked, ScanTools shows the Edit Correction (dialog box).
This group box lets you set up two items - a Conversion profile and an Output file box.
Select the conversion profile to be used for online conversion during scanning.
Select the output file that stores the converted data.
This group box applies to both data files and output conversion files. The following radio buttons let you determine how new data is stored in the data file and converted file.
When Append is selected, new data is added after the last data record of the Data file or Converted file.
NOTE: The SPSS conversion format does not support appending to the converted output file. Instead, the converted output file will be replaced.
When Replace is selected, new data replaces (writes over) all the old data in the Data file or Converted f All old data in the Data file or Converted file is erased and cannot be recovered.vered.
NOTE: The Replace at S/N option is not available for online conversion.
When Replace at Serial Number (S/N) is selected, new data replaces (writes over) old data beginning at the Serial Number specified on the Scanner Control tab. To use this option, you must have Scanning Options checked in the Confirmations dialog which is accessed from the Configure Menu.
When you use this option with Confirmations on, the Scanning Options dialog appears when you begin scanning using the Scan button or Scan Action. At that time (just before scanning actually begins), under Serial Number, enter the serial number where you want the replacing to begin.
NOTE: If you scanned in the 1900’s, and then in the next century (2000’s), select Append or Replace at S/N to add records to the data file; the two-digit year for date scanned can be converted only to either 19xx or 20xx. This is done using a conversion profile, NCS Header Year Format - Conversion Profile You cannot achieve a mix of 19xx and 20xx dates in the converted file header.
The Scanner Control tab provides the capability for setting the Stop Scanner On, Batch Data, Transport Printer, and Read Parameters fields.
NOTE: You should view and check these settings each time you change the scanner configuration (either a different scanner, or different equipment on the same scanner) with the same application.
When the currently configured scanner does not have a select stacker, stopping on any error is mandatory. In this case, this option is always checked; it is disabled and you cannot change it.
When the currently configured scanner has an integrated select stacker or has an optional select stacker installed and configured, you can uncheck this option. In this case, when one of the system errors listed below is encountered, the sheet will go to the select stacker and scanning continues to the next sheet. "System Error" will be displayed in the Scanning Progress dialog for the selected sheet.
NOTE: For OpScan 3/4/4U and OpScan iNSIGHT 4 scanners, determine whether the scanner has a select stacker and check or uncheck the Select Stacker option in the Scanner Configuration dialog as needed. If ScanTools' knowledge of your scanner configuration is incorrect and it is told there is a select stacker when there is not one, it may result in unrecognized sheets being ignored when the Stop Scanner On System Errors check box is unchecked.
NOTE: If this option is ON, you cannot scan a batch of forms that vary in thickness.
If this box is NOT checked, the ScanTools application controls thickness checking based on the Sheet Thickness value defined in the New Document or Select Document dialog. For more information, see Sheet Thickness Checking.
The data in these fields is recorded in the NCS Header of each document record.
CAUTION: If you do not change the Print Position, the print string prints over the current position, probably making it illegible. If you set the run number to greater than one, the Print Position does NOT automatically change. We recommend that you change the print position setting when the run number is greater than one.
The word Today, indicating that your PCs system date is used as the scan date.
Any other date, in the general form m/d/y. The range of valid Date years is 1980 - 2099. If you enter an abbreviated value for the year, ScanTools software converts it as follows:
|
Entered Date year |
Effective Date year |
|---|---|
|
80 - 99 |
1980 - 1999 |
|
0 - 79 |
2000 - 2079 |
The scan date is always stored in the NCS Header as six characters (mmddyy).
The check boxes in this area specify what you want printed. In addition to the items listed below, printing can also be defined in the application Output Field Entry dialog, the edit profile On Failure dialog, and the score profile Print Scores dialog - Score Profile.
See Transport Printing for more information about how printing is implemented in ScanTools software. Refer to your scanner Operator’s Manual for the specific capabilities of the transport printer on the scanner you are using; this includes the number of characters that can be printed on a sheet, and the location on the sheet where the printing can occur.
If this box is not checked, the scan date is printed in the format mm/dd/yy.
This option is available only when the Scan Date print option is checked.
NOTE: This setting is used only for printing, not for storing the year in the NCS Header. The NCS Header always stores the year as two digits, using the last two digits (mmddyy).
NOTE: We recommend that you change the print position setting when the run number is greater than one. If you do not change the Print Position, the print string prints over the current position, probably making it illegible. If you set the run number to greater than one, the Print Position does NOT automatically change.
iNSIGHT 20 and iNSIGHT 30 Scanners: The iNSIGHT 20 and iNSIGHT 30 scanners do not have a Transport Printer. Any items checked will be ignored when scanning with that scanner.
EZData Scanner: The EZData scanner does not have a Transport Printer. Any items checked will be ignored when scanning with that scanner.
Read parameter controls are located in both the Read Controls dialog and the Read Parameters section of the Scanning Options dialog. The controls provided in these two dialogs are similar and they are, in fact, interrelated. The key considerations regarding how they work together are:
The Read Parameters box allows you to adjust the appropriate mark threshold and discrimination margin levels of OMR Bubbles, Check Marks, and Tick Marks for the documents being scanned. The values are originally set for the application in the Read Controls dialog.
The Read Parameters are enabled only if the application Read Controls dialog, Scan Time Read Parameters Control is set to Keyword Level Control or Absolute Level Control.
The Read Parameters are disabled if the application Read Controls dialog, Scan Time Read Parameters Control is set to None, which means you cannot change the values at scan-time.
For most documents, a threshold level of Normal and a discrimination level of Medium are appropriate. You can adjust these levels (if necessary) when scanning batches of problem forms.
Light detects very light marks.
Normal is the setting to use for most normal scanning tasks.
Dark detects only very heavy marks.
Low causes ScanTools software to pick one mark over another, even if they are very similar.
Medium balances picking one mark over another based on their differences, without requiring moderate differen Medium is the setting to use for most normal scanning tasks.tasks.
High causes ScanTools software to pick one mark over another only if they differ significantly.
EZData Scanner: This setting is NOT used by the EZData scanner.
Some application definitions enable you to select numeric values for threshold and discrimination. Refer to your scanner's user guide for information on appropriate values. Also see Scanner Read Levels.
|
See Help on Help for additional information on using this help file. See Scantron Technical Support for additional information on technical support and training options. See the ScanTools Suite System Requirements for further details on hardware and software requirements. ScanTools is a suite of products; the specific information you want may appear in the help for a different module. If you don't find what you're looking for here, try one of the following:
|
Scantron Corporation
Customer Service (forms, products, and services): 1-800-SCANTRON (722-6876) Technical Support: 1-800-445-3141 |
|
|
Copyright © 1998-2012 Scantron Corporation. All rights reserved. Use permitted only under license. www.scantron.com. No part of the Help or user guides may be reproduced in any form, or by any means, without express permission from Scantron Corporation. LINKS TO THIRD PARTY SITES This help system may contain links to third party websites ("Linked Sites"). The Linked Sites are not under the control of Scantron and Scantron is not responsible for the content of any Linked Site, including without limitation any link contained in a Linked Site or any changes or modifications to a Linked Site. Scantron is not responsible for web casting or any other form of transmission received from any Linked Site. Scantron provides Users with the ability to link the Assessment System to the Linked Sites as a convenience to you, and the inclusion of any link does not imply endorsement by Scantron of the Linked Site or any association with its operators. |
||