Defining OMR Grids

The following procedures describe the general steps required to define a grid. Choose whichever one you find easier.  Use the tutorial in the ScanTools User’s Guide to gain a thorough knowledge of how to define grids.

This procedure uses the ScanTools Plus Application Module, which is accessed from the ScanTools Plus Main Window, by selecting New or Open from the Application menu.

NOTE: If you are using the ScanFlex option with your application, be sure to enable ScanFlex before scanning to define timing marks, form ID marks, or OMR grids. See Application Settings dialog.

The Click+Drag Method

  1. Open the Application Module and select the application and document you want to work with.
  2. Open the OMR Tool. Select the OMR Type and Mark Style, the response position spacing (Cell and TM settings), and the grid Orientation arrow.
  3. If you have added a background form image of the sheet to the document and can see the response grid, you can skip this step. Mark the corners of the grid area on a sample sheet. Load the sheet into the input hopper and click Scan Sheet so that the marks you just made are shown on right side of the screen.
  4. Move the mouse pointer to the starting corner of the grid. Click the left mouse button, and drag the pointer to the opposite corner of the grid. As you drag the pointer, the grid appears in the grid definition area. The arrow inside the grid indicates grid data order.

  1. In the lower left corner of the application module window, click the New button. The Output Field Entry dialog box appears.
  2. Define the characteristics of the output field that data from the grid will be transferred to.
  3. Click OK.
  4. In the lower left corner of the application module window, click the Append button. This associates the grid with the output field. If you do not associate a grid with the output field, the field name appears in the Fields list with an asterisk ( * ) following it.

TIP: If you make a mistake in the Click+Drag method, click the Undo Grid Definition button to start over.

The 5-Click Method

  1. Open the Application Module and select the application and document you want to work with.
  2. Open the OMR Tool. Select the OMR Type and Mark Style.
  3. Before starting to define grids, plan the layout of each sheet. For each sheet, mark a sample sheet with grid boundaries, as shown in the following diagram.

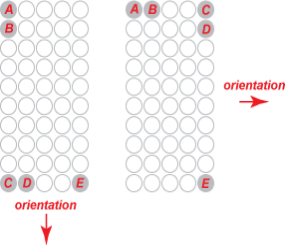
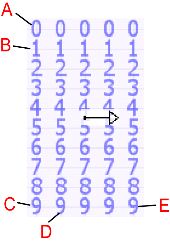
NOTE: The letters A, B, C, D, and E indicate the bubbles that need to be filled in. The grid could be alphanumeric or numeric. Grid orientation and data order depend on the click sequence you select.

  1. In the lower left corner of the ScanTools Plus Application Module window, click the Scan Sheet button to scan the marked sample sheet. The marks will show up in the sheet shown on the right side of the screen.
  2. Click the mouse pointer on A, B, C, D, and E, in that order. You must click in the exact order of the positions on the grid. For example:
  • A indicates the first response position of the first character in the grid
  • B indicates the spacing to the second response position of the first character in the grid
  • C indicates the last response position of the first character in the grid
  • D indicates the spacing to the last response position of the second character in the grid
  • E indicates the last response position of the last character in the grid


  1. In the lower left corner of the application module window, click the New button. The Output Field Entry dialog box appears.
  2. Define the characteristics of the output field that data from the grid will be transferred to.
  3. Click OK.
  4. In the lower left corner of the application module window, click the Append button. This associates the grid with the output field. If you do not associate a grid with the output field, the field name appears in the Fields list with an asterisk ( * ) following it.

TIP: If you make a mistake in the 5-Click method, click the Undo Grid Definition button to back up by steps.

See Grid Definition Procedures for information about copying and pasting grids, grid data order, and grid definition shortcuts.

Related topic


See Help on Help for additional information on using this help file.

See Scantron Technical Support for additional information on technical support and training options.

See the ScanTools Suite System Requirements for further details on hardware and software requirements.

ScanTools is a suite of products; the specific information you want may appear in the help for a different module. If you don't find what you're looking for here, try one of the following:


Scantron Corporation

Customer Service (forms, products, and services):

1-800-SCANTRON (722-6876)

www.scantron.com

Technical Support:

1-800-445-3141

support@scantron.com

Copyright © 1998-2012 Scantron Corporation. All rights reserved. Use permitted only under license. www.scantron.com. No part of the Help or user guides may be reproduced in any form, or by any means, without express permission from Scantron Corporation.

LINKS TO THIRD PARTY SITES

This help system may contain links to third party websites ("Linked Sites"). The Linked Sites are not under the control of Scantron and Scantron is not responsible for the content of any Linked Site, including without limitation any link contained in a Linked Site or any changes or modifications to a Linked Site. Scantron is not responsible for web casting or any other form of transmission received from any Linked Site. Scantron provides Users with the ability to link the Assessment System to the Linked Sites as a convenience to you, and the inclusion of any link does not imply endorsement by Scantron of the Linked Site or any association with its operators.