Developing MergePrint Utility Applications
The MergePrint Utility is a standalone version of the Scantron DesignExpert merge printing software feature. It is designed for users who don’t need to have Scantron DesignExpert software’s full form design capability but do need to perform their own merge printing from a database or who simply need to print "blank" forms (forms with no database merge). The MergePrint Utility is installed automatically with Scantron DesignExpert software so that users can develop and test merge printing applications for MergePrint Utility users at distributed print locations.
Merge printing functions include:
- Printed form personalization, including variable text, bar codes, pre-slugged OMR response grids, serial numbers, and/or database record numbers. Static text and graphics can also be printed.
- Scantron DesignExpert stock forms 103188 and 265914 overprinting and personalization, including form printing (except the timing track) plus variable text, bar codes, pre-slugged OMR response grids, Litho-codes, serial numbers, and/or database record numbers.
- Plain paper printing, available with the PrintFlex option, including complete form printing, variable text, bar codes, pre-slugged OMR response grids, Litho-codes, serial numbers, and/or database record numbers.
The "blank" form printing functions you can perform include:
- Scantron DesignExpert stock forms 103188 and 265914 overprinting, including form printing (except the timing track).
- Plain paper printing of form designs for Scantron DesignExpert stock forms 103188 and 265914, with the PrintFlex option.
- Plain paper OMR printing, with the PrintFlex option, including complete form printing.
In addition to MergePrint Utility software, you must have the following to perform merge printing:
- A merge template - A Scantron DesignExpert "merge template" file contains placeholders for variable data from a database. This file must be created with Scantron DesignExpert software.
- A database file - This may be a comma separated text file, tab delimited text file, Microsoft Excel file, or Microsoft Access file.
- A laser printer - A laser printer can be used for pre-slugging, pre-printing, or bar coding. A laser printer is required for printing with Scantron DesignExpert stock form 103188 or 269514 and for printing OMR forms on plain white paper using the MergePrint Utility with the PrintFlex Utility.
- Forms or paper - This may be scannable forms printed by Scantron, Scantron DesignExpert stock form 103188 or 269514, or plain white paper (if you use the MergePrint Utility with the PrintFlex option).
Developing and Implementing MergePrint Utility Applications
Merge Templates and form design files for MergePrint Utility applications and Scantron DesignExpert Merge Wizard use are the same. Testing and implementing MergePrint Utility applications may require additional effort, however. Following are some considerations and questions for the MergePrint Utility application developer:
- MergePrint Utility users can’t open and modify your MergePrint templates unless they also have access to Scantron DesignExpert software.
- MergePrint Utility software can open files that were created using the same version of DesignExpert software or later. For example, to use files created with Scantron DesignExpert software version 6.0, MergePrint Utility users must have MergePrint Utility software version 6.0 or later installed.
- Users may not have, or need, detailed knowledge of how your application works.
- Various laser printer brands and models might be used. How many will you need to test?
- Black and white and/or color laser printers might be used.
- Testing merge printing applications with the Scantron DesignExpert Merge Wizard and with the MergePrint Utility.
- Test your merge printing application on one or more different PCs that only have the MergePrint Utility installed and are representative of what your MergePrint users have.
- Providing users with merge databases.
- Providing users with directions for creating their own merge databases to use with your Merge Templates.
- Various forms and papers might be used.
- Are commonly available fonts used?
- Will you need to provide end users with special fonts?
- Are graphics included?
- Will you need to provide end users with special graphics or will users be able to provide their own graphics?
- Creating instructions for user installation and implementation.
- Training users.
- Supporting users.
- Do your users have the correct version of the MergePrint Utility installed? Is it the latest version? Will they need the optional PrintFlex module?
- PrintFlex form testing, if applicable.
- Make sure that Text and Caption Text boxes are large enough to fit the largest amount of text you expect to merge from your database.
CAUTION: Text boxes do not auto-expand if you are merge printing text from a database. If the box is too small, the text that doesn’t fit will be truncated.
Merge Printing Text
Scantron DesignExpert can merge print variable data from a database to Text areas. This feature is in addition to and slightly different from merge printing of variable data in Caption Text areas.
When you specify delimited field names in a text area, the merge field is substituted for the delimited field. The delimiter is "{VARIABLE_field}", where field is the name of the merge print field. There can be one or more text fields per document. There can be one or more merge fields contained within a single text box. The same field name may occur multiple times in the single text box.
When you design your form, you must make the text box large enough to accommodate the largest expected block of merged text. The size of the text box does not change to accommodate the merge text at merge time.
Merging is controlled by and the
Understanding Printing Components
To perform merge printing or to print "blank" forms with the MergePrint Utility, you will need some or all of these components. Your application developer should provide you with the components you need and/or instructions regarding what you need to do.
| This component… | …has these requirements |
|---|---|
|
MergePrint Utility Software |
You must have your own copy of MergePrint Utility or MergePrint Utility with PrintFlex software. |
|
Paper |
Paper requirements vary, depending on your document type:
Your application developer should provide instructions regarding what paper to use for each application. |
|
Database File |
If you need to perform merge printing, you must have a Comma Separated Text, Tab Delimited Text, Microsoft Excel, or Microsoft Access database file containing variable information to be merge printed. NOTE: See Merge Wizard Overview for additional information about Microsoft Excel database support, including our recommendation to convert Excel files to either comma separated or tab delimited text files. The database file may be provided to you by your application developer or you may be provided with instructions for creating it yourself. A database file is not required if you are printing "blank" forms on Scantron DesignExpert stock form 103188 or 265914, or on plain paper with the PrintFlex option. |
|
Laser Printer |
You must have a laser printer. Both black and white and color laser printers are supported. |
|
Scantron DesignExpert File for Merge Printing |
If you need to perform merge printing, you must have a Scantron DesignExpert software file that contains placeholders for variable information from your database, serial numbers, or database record numbers. This file must be provided by your application developer. It may include:
Scantron DesignExpert software file type(s) to use:
NOTE: Your application developer may optionally set this file up so that you can also use it to print "blank" forms. MergePrint Utility software can use files created with Scantron DesignExpert software version 6.0 and later. |
|
Scantron DesignExpert File for Printing Blank Forms |
If you need to print "blank" forms, you must have a Scantron DesignExpert software file (*.dew) that contains the complete form to be printed. This file must be provided by your application developer. It may include:
NOTE: Your application developer may optionally set this file up so that it also contains merge printing placeholders. The placeholders are not printed when you select "None" for your database. The option to print "blank" forms is not available for OMR forms without the PrintFlex option. MergePrint Utility software can use files created with Scantron DesignExpert software version 6.0 and later. |
|
Graphics |
A graphic file must be included for each graphic in the form design. Graphics are not embedded in the merge template file. Instead, the file will contain a placeholder for each graphic that includes the path to the actual graphic file. Since you can’t modify the path in the placeholder, your application developer must provide instructions regarding where to save your merge template and graphics files so that the MergePrint Utility can find them. The message "Unable to load graphic" appears if the MergePrint Utility cannot locate the required graphic. |
|
Fonts |
We recommend that you use only generally available fonts in merge template files since the MergePrint Utility uses fonts available on your system. This includes font style attributes such as Bold and Italic. Fonts are not embedded in the merge template file. If your application requires fonts that are not commonly available, your application developer must either provide the fonts or instructions for getting and installing them. There is no missing font warning. If the required fonts are not available on your system, a substitute font is used. Results may be undesirable. |
|
Instructions |
The instructions provided by your application developer should be specific to your application. For example:
|
Understanding Merge Text Style Control
Scantron DesignExpert software has a Merge Text Style Control feature that enables you to control the style attributes of text printed from your merge database in addition to controlling it from the merge fields in your form. This feature can be used with merged text in both text and caption text fields.
Depending on the result you want, merge text style can be controlled by the placeholder on the form or by a tag in the database:
- To get the same text attributes for merged text on all forms, define text attributes in the placeholder on the form.
- To get different text attributes for merged text on each form, define text attributes in the database.
This feature is available with the MergePrint software utility in addition to the Scantron DesignExpert Merge Wizard.
When text style for a merge field is controlled by the merge field placeholder on your form, the appearance of text printed on every form is the same. For example, if a merge field on your form is defined as Times New Roman, 14 point, then text merge printed on every form for this field will be Times New Roman, 14 point:
| Text Attributes |
Merge Field Placeholder Examples |
Printed Text Examples |
|---|---|---|
|
Times New Roman, 14 point |
{Name} |
Allan Barnes |
|
Arial, 12 point, Bold |
{Name} |
Becky Colter |
|
Times New Roman, 16 point, Bold, Italic, Red, 50% |
{Name} |
Charles Davis |
See Modifying Text Boxes or Modifying Caption Text for details on setting text attributes on placeholders.
When text style for a merge field is controlled by a tag in the merge database, the appearance of text printed on each form can differ.
Text Style Control attributes include Bold, Italic, Underline, Font and Size, Color and Screen percentage:
|
Text Attributes |
Examples |
|---|---|
|
Bold |
Allan Barnes |
|
Italic |
Becky Colter |
|
Underline |
Charles Davis |
|
Font and Size |
Denise Edison |
|
Color and Screen Percentage |
Elizabeth Garman |
These controls can be applied singly or in any combination. For example,
|
Text Attributes |
Examples |
|---|---|
|
Bold, Italic |
Allan Barnes |
|
Italic, Underline |
Becky Colter |
|
Font and Size, Color and Screen Percentage |
Charles Davis |
|
Bold, Color and Screen Percentage |
Denise Edison |
NOTE: Merge field (placeholder) text attributes Bold, Italic, and Underline override text attribute tags in your database. For example, if your merge field is Bold, your printed text will be Bold even if the <Bold/> tag is not included in your database.
The following chart displays the available text attributes, the tag for each attribute, an example of how the tag is applied in the database for a merge field called "Name" and an example of what the printed results will be with the application of this tag. An explanation of tag formatting requirements follows.
|
Text Attribute |
Tag |
Database Example |
Printed Result |
|---|---|---|---|
|
None |
None |
Name |
Allan Barnes |
|
Bold |
<Bold/> |
<Bold/>Name |
Allan Barnes |
|
Italic |
<Italic/> |
<Italic/>Name |
Allan Barnes |
|
Underline |
<Underline/> |
<Underline/>Name |
Allan Barnes |
|
Font and Size |
<Font name: FontName1 size: FontSizeInPoints2/> |
<Font name: Times New Roman size: 16/>Name |
Allan Barnes |
|
Color and Screen percentage |
<Color index: ColorPaletteIndex3 screen: ScreenPercent4 /> |
<Color index: 2 screen: 100 />Name |
Allan Barnes |
|
Bold, Font and Size |
<Bold/><Font name: FontName size: FontSizeInPoints/> |
<Bold/><Font name: Times New Roman size: 16/>Name |
Allan Barnes |
|
Underline, Color and Screen percentage |
<Underline/><Color index: ColorPaletteIndex screen: ScreenPercent /> |
<Underline/><Color index: 2 screen: 100 />Name |
Allan Barnes |
|
|||
- Tags are case sensitive, as shown in the chart above.
- Tag syntax is as shown in the chart above.
If you need to print a tag that is included in your database, place the tag <Escape> before and after the tag to be printed. For example:
|
Database Example |
Printed Result |
|---|---|
|
<Bold/><Escape><Bold/><Escape> Name |
<Bold/> Allan Barnes |
- The Merge Wizard and the MergePrint Utility support Merge Text Style Control with all Scantron DesignExpert supported database types.
|
Database Type |
Merge Wizard |
MergePrint Utility |
|---|---|---|
|
Comma delimited (*.csv) text files |
Yes |
Yes |
|
Tab delimited (*.txt) text files |
Yes |
Yes |
|
Microsoft Access (*.mdb) files |
Yes |
Yes |
|
Microsoft Excel (*.xls) files |
Yes |
Yes |
TIP: See Merge Wizard Overview for additional information about Microsoft Excel database support, including our recommendation to convert Excel files to either comma separated or tab delimited text files.
Text and caption text box sizes are fixed in your design. If you are merge printing either type of text, make sure that the text box is large enough to fit the largest amount of text you expect to merge from your database. If the box is too small, the text that doesn’t fit will be truncated.
CAUTION: If you are merge printing caption text or paragraph text that will be read with the optional RealTime Character Recognition component of Scantron ScanTools Plus software, see ScanTools Help for font recommendations.
Understanding Pre-slug Mark Alignment
As you merge print your forms, it's normal for OMR pre-slug marks to vary somewhat in location. This is acceptable as long as each target OMR response position is mostly covered.
Ideally, pre-slug marks should be perfectly aligned with the OMR response positions on your form:
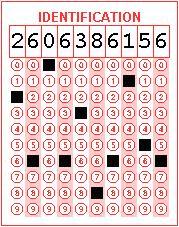
Realistically, it isn't practical to expect perfect pre-slug mark alignment due to variations in paper alignment in the laser printer paper tray, paper feed through the laser printer, and other variables. Marks like these are normal and acceptable:
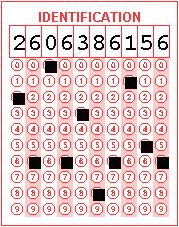
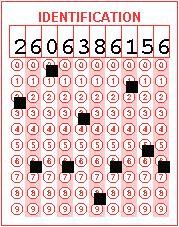
Marks that do not cover most of the target OMR response position and that touch nearby response positions are questionable. The data may be read correctly but the only way to tell for sure is to scan the form and check the data.
Pre-slugging OMR responses is a process that requires a little practice and a little time to build experience with your forms, laser printer, scanner, and ScanTools application. We recommend you take a practical approach to this process:
- Aim for good, consistent mark alignment at the start of your pre-slugging project. Aiming for perfect mark alignment is a good objective but it isn't necessary or practical.
- Take time to check questionable mark alignment at the start of your pre-slugging project. Learn what works with your combination of forms, laser printer, scanner, and ScanTools application. Save examples of good and bad mark alignment for future reference.
- Pay more attention to mark alignment when something in your system changes: new forms, different laser printer, different scanner, updated ScanTools application, etc.