Working with the MergePrint Utility
The MergePrint Utility is a standalone version of the Scantron DesignExpert merge printing software feature. It is designed for users who don’t need to have Scantron DesignExpert software’s full form design capability but do need to perform their own merge printing from a database or who simply need to print "blank" forms (forms with no database merge). The MergePrint Utility is installed automatically with Scantron DesignExpert software so that users can develop and test merge printing applications for MergePrint Utility users at distributed print locations.
Merge printing functions include:
- Printed form personalization, including variable text, bar codes, pre-slugged OMR response grids, serial numbers, and/or database record numbers. Static text and graphics can also be printed.
- Scantron DesignExpert stock forms 103188 and 265914 overprinting and personalization, including form printing (except the timing track) plus variable text, bar codes, pre-slugged OMR response grids, Litho-codes, serial numbers, and/or database record numbers.
- Plain paper printing, available with the PrintFlex option, including complete form printing, variable text, bar codes, pre-slugged OMR response grids, Litho-codes, serial numbers, and/or database record numbers.
The "blank" form printing functions you can perform include:
- Scantron DesignExpert stock forms 103188 and 265914 overprinting, including form printing (except the timing track).
- Plain paper printing of form designs for Scantron DesignExpert stock forms 103188 and 265914, with the PrintFlex option.
- Plain paper OMR printing, with the PrintFlex option, including complete form printing.
In addition to MergePrint Utility software, you must have the following to perform merge printing:
- A merge template - A Scantron DesignExpert "merge template" file contains placeholders for variable data from a database. This file must be created with Scantron DesignExpert software.
- A database file - This may be a comma separated text file, tab delimited text file, Microsoft Excel file, or Microsoft Access file.
- A laser printer - A laser printer can be used for pre-slugging, pre-printing, or bar coding. A laser printer is required for printing with Scantron DesignExpert stock form 103188 or 269514 and for printing OMR forms on plain white paper using the MergePrint Utility with the PrintFlex Utility.
- Forms or paper - This may be scannable forms printed by Scantron, Scantron DesignExpert stock form 103188 or 269514, or plain white paper (if you use the MergePrint Utility with the PrintFlex option).
There are several types of forms you can create with Scantron DesignExpert software and several types of laser printing that you can perform:
| This scenario… | …meets this objective… | …in this tool |
|---|---|---|
|
Print a proof of your form design to review or share with colleagues. |
You are mostly concerned with getting the printing to fit on the page. Exact printer alignment to meet scanning requirements is probably not needed. The appearance of the form is most important. |
Scantron DesignExpert |
|
Merge printing information from a database on forms that were printed by Scantron Print Services. |
You are mostly concerned with getting text, OMR pre-slug marks, and bar codes to align with specific areas or OMR response grids on the printed form. The scannability of the form is most important. |
|
|
Print a form on Scantron DesignExpert stock forms 103188 or 265914. |
You are mostly concerned with getting the alignment marks in the corners of the Test Form to align with the marks in the corners of the stock form. The scannability of the form is most important. |
|
|
Print your own OMR forms with the PrintFlex option. |
You are mostly concerned with first, getting the printing to fit on the page, and second, getting the printing to align with the ScanFlex Alignment Guide. The scannability of the form is most important. |
|
See How do I at the bottom of this topic for specific instructions on aligning your printer for these scenarios.
To perform merge printing or to print "blank" forms with the MergePrint Utility, you will need some or all of these components. Your application developer should provide you with the components you need and/or instructions regarding what you need to do.
| This component… | …has these requirements |
|---|---|
|
MergePrint Utility Software |
You must have your own copy of MergePrint Utility or MergePrint Utility with PrintFlex software. |
|
Paper |
Paper requirements vary, depending on your document type:
Your application developer should provide instructions regarding what paper to use for each application. |
|
Database File |
If you need to perform merge printing, you must have a Comma Separated Text, Tab Delimited Text, Microsoft Excel, or Microsoft Access database file containing variable information to be merge printed. NOTE: See Merge Wizard Overview for additional information about Microsoft Excel database support, including our recommendation to convert Excel files to either comma separated or tab delimited text files. The database file may be provided to you by your application developer or you may be provided with instructions for creating it yourself. A database file is not required if you are printing "blank" forms on Scantron DesignExpert stock form 103188 or 265914, or on plain paper with the PrintFlex option. |
|
Laser Printer |
You must have a laser printer. Both black and white and color laser printers are supported. |
|
Scantron DesignExpert File for Merge Printing |
If you need to perform merge printing, you must have a Scantron DesignExpert software file that contains placeholders for variable information from your database, serial numbers, or database record numbers. This file must be provided by your application developer. It may include:
Scantron DesignExpert software file type(s) to use:
NOTE: Your application developer may optionally set this file up so that you can also use it to print "blank" forms. MergePrint Utility software can use files created with Scantron DesignExpert software version 6.0 and later. |
|
Scantron DesignExpert File for Printing Blank Forms |
If you need to print "blank" forms, you must have a Scantron DesignExpert software file (*.dew) that contains the complete form to be printed. This file must be provided by your application developer. It may include:
NOTE: Your application developer may optionally set this file up so that it also contains merge printing placeholders. The placeholders are not printed when you select "None" for your database. The option to print "blank" forms is not available for OMR forms without the PrintFlex option. MergePrint Utility software can use files created with Scantron DesignExpert software version 6.0 and later. |
|
Graphics |
A graphic file must be included for each graphic in the form design. Graphics are not embedded in the merge template file. Instead, the file will contain a placeholder for each graphic that includes the path to the actual graphic file. Since you can’t modify the path in the placeholder, your application developer must provide instructions regarding where to save your merge template and graphics files so that the MergePrint Utility can find them. The message "Unable to load graphic" appears if the MergePrint Utility cannot locate the required graphic. |
|
Fonts |
We recommend that you use only generally available fonts in merge template files since the MergePrint Utility uses fonts available on your system. This includes font style attributes such as Bold and Italic. Fonts are not embedded in the merge template file. If your application requires fonts that are not commonly available, your application developer must either provide the fonts or instructions for getting and installing them. There is no missing font warning. If the required fonts are not available on your system, a substitute font is used. Results may be undesirable. |
|
Instructions |
The instructions provided by your application developer should be specific to your application. For example:
|
It is very important to correctly load paper in the laser printer paper tray before printing or performing printer alignment. The basic steps to remember are Jog, Orient, and Align.
- Jog: Jog the paper until the stack is uniform. The laser printed image will not be consistent if the paper in the tray is not uniformly stacked.
- Orient: Turn the paper so that the laser printed image is in the correct orientation and on the correct side. Paper orientation varies depending on whether your design is portrait or landscape format, prints head-to-head or head-to-foot, or is double-sided. It may also vary between models of desktop laser printers so you may need to experiment with your printer to determine the correct orientation for your form.
- Align: Load the stack of paper so that it's aligned with the side of the tray. The laser printed image will not be consistent if the stack of paper in the tray is not uniformly aligned. Be sure to use the same alignment every time you load the tray.
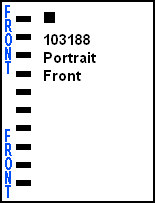
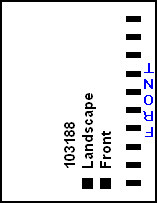
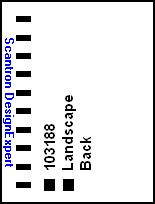
CAUTION:Scantron DesignExpert stock form 103188 has Front and Back sides that differ slightly. They are distinctly marked. The Front and Back sides of Scantron DesignExpert stock form 265914 are the same for printing purposes.
Review the appropriate paper loading procedures for stock forms 103188 and 265914:
-
 Loading Stock Form 103188 in a Single-Sided Laser Printer
Scantron DesignExpert stock form 103188 must be loaded in your laser printer tray in a particular orientation, depending on whether you are printing portrait or landscape format and whether you are printing the front or back of the form. Your printer may differ so be sure to test before you print finished forms.
The Front side of Form 103188 is labeled "FRONT" in the margin beside the timing track. The Back side of the form has the Scantron product name and copyright in the margin beside the timing track.
Portrait Front
- The timing track is on the left side.
- The stack is jogged to the left.
Portrait Back
- The timing track is on the right side.
- The stack is jogged to the left.
Landscape Front
- The timing track is on the right side.
- The stack is jogged to the left.
Landscape Back
- The timing track is on the left side.
- The stack is jogged to the left.
-
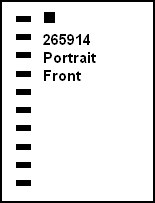
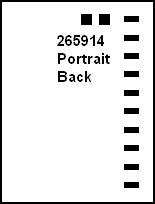
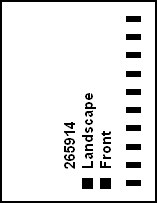
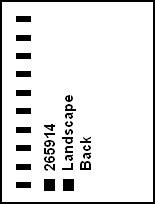
Loading Stock Form 265914 in a Single-Sided Laser Printer
Scantron DesignExpert stock form 265914 must be loaded in your laser printer tray in a particular orientation, depending on whether you are printing portrait or landscape format. Your printer may differ so be sure to test before you print finished forms.
The front and back sides of form 265914 are identical for printer alignment and laser printing purposes.
Portrait Front
- The timing track is on the left side.
- The stack is jogged to the left.
Portrait Back
- The timing track is on the right side.
- The stack is jogged to the left.
Landscape Front
- The timing track is on the right side.
- The stack is jogged to the left.
Landscape Back
- The timing track is on the left side.
- The stack is jogged to the left.

As you merge print your forms, it's normal for OMR pre-slug marks to vary somewhat in location. This is acceptable as long as each target OMR response position is mostly covered.
Ideally, pre-slug marks should be perfectly aligned with the OMR response positions on your form:
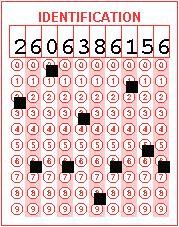
Realistically, it isn't practical to expect perfect pre-slug mark alignment due to variations in paper alignment in the laser printer paper tray, paper feed through the laser printer, and other variables. Marks like these are normal and acceptable:
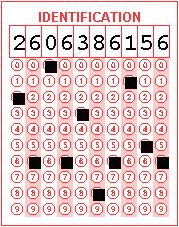
Marks that do not cover most of the target OMR response position and that touch nearby response positions are questionable. The data may be read correctly but the only way to tell for sure is to scan the form and check the data.
Pre-slugging OMR responses is a process that requires a little practice and a little time to build experience with your forms, laser printer, scanner, and ScanTools application. We recommend you take a practical approach to this process:
- Aim for good, consistent mark alignment at the start of your pre-slugging project. Aiming for perfect mark alignment is a good objective but it isn't necessary or practical.
- Take time to check questionable mark alignment at the start of your pre-slugging project. Learn what works with your combination of forms, laser printer, scanner, and ScanTools application. Save examples of good and bad mark alignment for future reference.
- Pay more attention to mark alignment when something in your system changes: new forms, different laser printer, different scanner, updated ScanTools application, etc.
How do I use the utility?
- Click Start | Programs | Scantron DesignExpert Software | MergePrint. The MergePrint or MergePrint with PrintFlex window appears.
- Select File > Open and select the Scantron DesignExpert file that you will be using (e.g., LocPrint.Dew).
- After you confirm that the displayed file is the one you want to merge, select File > Merge Wizard. The first Merge Wizard step appears. Complete the wizard and print your form(s).